
The Rongai Route
Rongai Route statistics:
Durations: 4-6 days ascent only; total including descent: 5-7 days;
Distance: 37.65km/23.5 miles ascent on regular route; 36.75km/22.75 miles descent; total walking 74.4km/46.25 miles)
CONTENTS
- Are you sure it’s called the Rongai Route?
- What are the disadvantages with this path
- And what are the advantages?
- The Rongai itinerary
The Rongai Route is the only trail to approach Kibo from the north. We have marked it in red on the map, below.
The trail starts near the Tanzanian town of Loitokitok, after which the trail was officially named (though everybody still refers to it as the Rongai Route).
For the final push to the summit, trekkers on this trail take the Kibo Hut Route, joining it either at the huts themselves or at the 5000m mark just below Hans Meyer Cave.
The designated descent route is on the Marangu trail, drawn in green on the map below.
The trek can be completed in five days and four nights, but it’s safer if you take an extra day. Indeed, trekkers usually take the one-day detour to camp beneath Mawenzi peak at Mawenzi Tarn Huts. This adds an extra day as well, making it a trek of six nights/seven days in total.

ARE YOU SURE IT’S CALLED THE RONGAI ROUTE?
The name Rongai Route is actually something of a misnomer. Sure, it’s the name that everybody uses but, strictly speaking, it’s not the correct one.
The real, original Rongai Route used to start at the border village of the same name, but was closed several years ago by the authorities, though you will still see this route marked on some of the older maps.
Today, all trekkers who wish to climb Kili from the north now follow a different trail. This also known as the Loitokitok Route after the village that lies near the start.
(Just to confuse the issue still further, this isn’t officially the correct name either, for along the trail you used to see various signs calling this trail the Nalemuru Route. Today, this name is rarely used by anybody.)
OUR RONGAI PINTEREST BOARD!
Visit Climb Mount Kilimanjaro’s Rongai Route board on Pinterest.

CLIMB WITH THE EXPERTS!
* Experienced, safe – and brilliant! – guides
* New Routes
* Unmatched success rate for getting trekkers to the top
* The best information for trek preparations
* Fully fledged KPAP partners
* Strong ethical policy towards the environment
…And a lot less expensive than you’d think!
WHAT ARE THE DISADVANTAGES WITH THIS PATH?
At first glance, this trail seems decidedly unattractive. The lower slopes at the very start of the trail have been denuded by farmers and present a bleak landscape. The forest that follows is little more than a narrow band of woodland. This, in turn, soon gives way to some rather hot and shadeless heathland.
Indeed, the parched character of Kilimanjaro’s northern slopes often means trekking parties have to carry water along the way (often all the way from the Third Cave Campsite to the Outward Bound Hut). Your agency should have supplied you with enough porters for this.
And then there’s the expense: if you are booking your trek in Moshi, Arusha or Marangu, the cost of transporting you to the start of the trail can be quite exorbitant, pushing the price up above most other trails.
AND WHAT ARE THE ADVANTAGES?
So if this route is more expensive, dangerous and barren than all the others, why should anyone consider it?
Well for one thing, there’s the wildlife. Animals tend to gather where humans don’t, and because this side of the mountain sees fewer tourists, so your chances of seeing the local wildlife here are perhaps greater on this trail than on others. (The only possible rival to this trail for seeing wildlife is the Lemosho trail in the far west. Indeed, on both these trails it was once compulsory to have an armed ranger with you on the trail, though this is no longer considered necessary.)
For example, during the research for the first edition of the guide we encountered many colobus monkeys. Later that same day we came across an elephant skull, with elephant droppings and footprints nearby. While later at night our little party was kept awake by something snuffling around the tents (a civet cat, according to our guide).
Buffaloes and eland also frequent the few mountain streams on these northern slopes, though in the 20-plus years of climbing the Rongai Route I’ve never seen them.
The flowers, the views, the journey – it’s all great!
The flora is different here too, with its juniper and olive trees. It’s true that some of the stars of Kilimanjaro’s plant kingdom are absent on this trail. For example, neither the lobelias nor the giant groundsels appear regularly on the northern side. But fear not, as both can be found in abundance on the Marangu Route, the designated descent route for the Rongai Route.
Furthermore, opt for the Mawenzi diversion (see above), and you will spend a night at the Mawenzi Tarn Hut. This not only allows you to savour some gobsmacking views across to Kibo but also gives you the chance the following day to walk across the Saddle. This is the favourite part of the mountain for many guides.
And finally, when it comes to getting to the actual summit, we found the walk from Outward Bound Huts to be marginally easier than that from Kibo Huts. (That said, the two do share, for the last 3-4 hours to the summit, the same path.)
Other advantages include the drive to the start. The journey gives you the chance to see village life Chagga-style, which we heartily recommend.
RONGAI ROUTE ITINERARY
The Rongai Route is the only trail to start on the northern side of the mountain. It is a lovely path involving an ascent of some 26.8km to the summit if taking the direct route, or 37.65km if taking the more sensible – and beautiful – diversion via Mawenzi Tarn. The descent route is Marangu, adding a further 36.75km or so to the total.
Though previously fairly quiet, the improvement and enlargement of the road around this eastern side of Kili combined, perhaps, with our effusive praise of the route in previous editions of the guide, has meant an increase in trekkers on the Rongai Route over the past couple of years, and we expect this trend to continue.
The following itinerary is for six days and follows the diversion via Mawenzi Tarn – as we believe more people take this route nowadays. Remember that most people take seven days on this route though it can be done in as little as five – though we think this is entirely too fast and neither recommend it nor, indeed, arrange such a brief trek for our clients.
DAY 1: RONGAI GATE TO SIMBA CAMPSITE
Distance: 7km; Altitude Gained: 638m

It is an inauspicious start to the trek. Our guide takes us up the slopes through what, for many trekkers, is the least-exciting part of the walk. It begins with a hot and dusty blemish of pine plantations. This is followed by fields of potato and maize, pockmarked with the wooden shacks of those who eke out a living from the soil.
It is about an hour before we turn right to escape into the lush green haven of the forest. When we do so, we’ll be disappointed to find just how quickly the tall trees of the montane forest give way to the more stunted vegetation of the heathland, such as giant heathers and St John’s wort. Still, narrow though it may be, this band of forest is still teeming with wildlife. In particular, a troop of colobus monkeys often graze by the entrance to the forest.
Leaving the forest on a trail that slowly steepens, about 50 minutes later we cross a stream to reach Simba Campsite. This sits at an altitude of 2635m. It’s always good to get to a campsite, and this one in particular is pleasant. Surrounded by heathers, with creatures snuffling about at night and birdsong waking us in the morning, this spot has a pleasingly wild, isolated ambience.
DAY 2: SIMBA CAMPSITE TO THIRD CAVE CAMPSITE OR KIKELELWA CAMP
Distance: 11.75km; Altitude Gained: 1040m
The start of this stage surprisingly heads westwards towards Kibo’s northern slopes rather than the eastern ones that we’ll eventually climb. Some trees still cling on at this altitude, but they are few in number and scattered. The heathers, too, are gradually shrinking in size now. For these reasons, the first part of this stage is rather shadeless and very hot.
After 45 minutes a river bed (dry for the best part of the year) joins us from the left and the path follows its course for most of the next hour. Look back occasionally and, weather permitting, we should be able to see a number of villages on the Kenyan side of the border, the sunlight glinting off the metal roofs.

Continuing upwards, the path steepens slightly and begins to turn more to the south. The terrain up here is rather rocky and bumpy. The path continues south-south-west, rounding a few minor cliffs and hills before eventually flattening out to arriving at small, waterless First Cave. As inviting as the cave and the shade it offers now appear, this is not our lunch stop. That lies 20 minutes further on through lizard country of bare rocks and long grasses and is known as the Second Cave (3487m).
Our options at Second Cave: Taking the path to Mawenzi Tarn
Here the path splits. If we’ve chosen the shorter, more direct route, then we’ll continue westwards. But if we’re taking the superior, longer version of the Rongai Route via Mawenzi Tarn, our trail takes an abrupt turn directly towards Mawenzi’s jagged peak.
Traversing open moorland the path meanders and undulates, so we will feel rather drained by the time we stumble into Kikelelwa Camp (3675m). This is situated by a couple of caves by the Kikelelwa River, with giant groundsels and lobelias flourishing nearby.
Incidentally, I don’t know why this should be so but whenever I have walked this stretch of the path it is usually either raining or very misty. It does, however, usually brighten up in the evening to reveal Kibo’s snowy summit peaking over the nearby ridge.)
Compared to the morning where we gained over 850m, this afternoon’s walk increases our altitude by less than 200m. That said, the distances of the two legs are about the same. And thanks to all the climbs and descents, this latter walk is just as exhausting!
DAY 4: KIKELELWA CAMP TO MAWENZI TARN HUT CAMPSITE
Distance: 3.75km; Altitude Gained: 627m
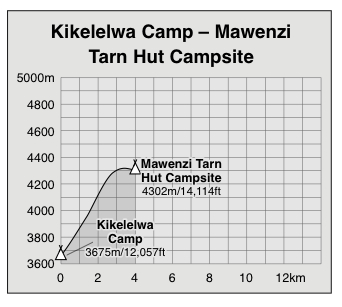
This stage to Mawenzi Tarn (4302m) is relatively short at less than 4km. As such, it is usually completed in a morning, which allows time for a brief acclimatization trek in the afternoon.
This morning’s walk is also steep as we gain over 600m. The path now sheds the moorland vegetation as it climbs steadily into the desert zone.
Mawenzi Tarn Hut Campsite (4302m) is situated in one of the most spectacular settings, in a cirque beneath Mawenzi. There’s a small ranger’s hut here and a toilet block.

Assuming the walk here was trouble-free we will have most of the afternoon to go on an acclimatization climb up the ridge to the west. If we’re lucky, the sky will be clear, affording us fantastic views of Kibo. In all probability, however, we’ll merely catch the odd glimpse through the clouds that usually roll in across the Saddle in the afternoon.
But no matter, for we’ll get the same views tomorrow morning when the skies should be clearer and the sun will be behind us too. The views back down to the Tarn – which, to be honest, is little more than a puddle with delusions of grandeur – are great too.
DAY 4: MAWENZI TARN HUT CAMPSITE TO KIBO HUTS
Distance: 8.9km; Altitude Gained: 412m

This lovely day begins with a slight retracing of our steps before we strike out westwards, crossing the ridge and dropping down the slope to the beautifully barren Saddle. With views like screensavers to east and west, it’s a rare trekker indeed who doesn’t rate this day as their favourite on the mountain. The flora is sparse but do look out for eland which are said to stroll up here.


We have two destinations at the end of this third day: School Hut or, more usually these days, Kibo Huts (4714m). Both lie on the lower slopes of Kibo, and act as launchpads for tonight’s assault on the summit.
NIGHT 4/DAY 5: KIBO HUTS CAMPSITE TO SUMMIT AND DESCEND TO HOROMBO HUTS
Distance: 6.25km to Uhuru Peak; plus 15.75km back to Horombo Huts
Altitude Gained/Lost: 1181m to Uhuru Peak, then 2174m descent from Uhuru to Horombo Huts

Rising at around midnight, we begin our slow march up to Gilman’s Point (5719m) on the edge of the Kibo crater, passing such features as Hans Meyer Cave (5259m).
It’s a steep, slow, cold march and a test of our endurance; this is where we’ll earn our Kilimanjaro certificate.
Nevertheless, providing we have avoided altitude sickness and have acclimatized well, there is no reason why we shouldn’t make it up to Gillman’s. This we reach, all being well, at around 5am, though it can be much later depending on both our condition and the conditions on the mountain.

Our work is not yet over, however, for it’s another hour and a half to Uhuru Peak. The gradient on this last section, especially by the standards of this night, is relatively flat. But at this altitude, every step can be exhausting. It is also a glorious walk, however, with glaciers and snowfields on one side and with views over the Kibo Crater on the other.
At the end of the trail lies our ultimate destination, Uhuru Peak: the highest point in Africa.
Here, if we’re on time, we can watch the sun rise over the African continent, take photos – and take a breather too!

The descent
After a rest at the top, we continue back down to Kibo Huts. It’s a walk that is considerably quicker than it was on the way up.
At Kibo we take breakfast and relax for an hour or so, before continuing our march down the mountain, through the Saddle, heath and moorland zones before stopping, finally, at the Horombo Huts once more.

We should arrive there at about 4pm, and we have been walking for around 16 hours! Exhausting but, if we made it to the top, we’ll think it was worth it!
DAY 6: HOROMBO HUTS TO MARANGU GATE AND RETURN TO HOTEL
Distance: 20km to Gate (20.75km on the Nature Trail); Altitude Lost: 1816m

And so we come to the last day of our trek. Today we march back through the forest to Marangu Gate, smiling smugly at all those coming up the slope the other way.
Stopping at the Mandara Huts for lunch, we continue heading down until we once more reach Marangu Gate. Here those who conquered the mountain – or at least made it to Gillman’s Point – collect their certificates.

Transport will be waiting to take everyone back to their hotel – a land of cold beers and warm showers. Our adventure of a lifetime is at an end, and civilization will rarely have felt so good!
RONGAI ROUTE GPS
For a file of GPS waypoints for all our routes, please click on the following link GPS Waypoints. This will take you to the relevant page on the website of Trailblazer Publications, who publish the Kilimanjaro guide. The file is in .gpx format, so you can download it straight onto your GPS.