Lemosho Route
Lemosho Route statistics:
Durations: 5-7 days ascent only; total including descent: 6-8 or even 9 days;
Distance: 46.26km/28.75 miles ascent on regular route; 20.6km/13 miles descent; total walking 66.86km/41.5 miles)
CONTENTS
WHAT DOES THIS TRAIL LOOK LIKE?
You can read a day-by-day itinerary for the Lemosho Route below. Here we describe it in brief:
The Lemosho trail is the only path that starts on the western slopes of the mountain. It thus provides trekkers a walk in the pristine forest of west Kilimanjaro – the best stretch of forest on the whole of the mountain. This is the main difference between it and the Shira Plateau Route, which usually starts above the forest (which is the main reason why we don’t recommend that trail).
On the map below, the Lemosho Route is marked out in yellow. It is the lower of the two paths that starts on the left-hand side of the map. (Look for the arrow off the map pointing to Mti Mkubwa or Big Tree Camp. This is the campsite on the first night. Shira 1 Camp, which is marked on the map, is your second night.)
The Big Tree Camp is set in the heart of the forest. After the forest, the Lemosho Route continues east to cross the Shira Plateau with lovely views of the snowy summit of Kilimanjaro, known as Kibo, permanently looming ahead.
Your choice of finish
When you reach the foot of Kibo you have two choices:
- most people head south via Barranco, Karanga Valley and Barafu to Stella Point. This is what we have shown on the map below.
- But it is also possible to head straight up the slopes of Kibo via the Western Breach Route. Stopping for a night at Arrow Glacier, you then continue to to crater floor and onto the summit.
The descent route for Lemosho is the Mweka trail. This is marked in purple on the map below.
Overall, allow 7-8 days if taking option 1, above. If taking the Western Breach route, it’s possible to do it in six or seven.

WHAT ARE THE ADVANTAGES WITH LEMOSHO?
Lovely forest, great views, wonderful scenery, fewer crowds (for the first few days at least) – these are all reasons why we think the Lemosho Route might be our favourite official trail on the mountain.
Perhaps most importantly for many people, the Lemosho trail has an excellent success rate for getting people to the summit. Because they’re also the longest routes on Kili, so your body has more chance to acclimatise – making the success rates for getting people to the summit is very high. (You also get to see more more of the mountain, of course.)
The trail also offers several options for side-trips. At the end of the second day you can attempt to scale Kili’s third summit, the Shira Ridge. The next day there’s the Shira Cathedral, on the southern side of the plateau, which has become a very popular excursion (and not just because there’s usually phone reception there). Again, such a side trip is useful for acclimatization purposes and no extra days need to be taken to do this either.
Indeed, one of the joys of the Lemosho Route is the variety of different trails one can take and itineraries one can build. Because there is no one standard ‘Lemosho Route’. Plus, of course, being a route that attacks the mountain from the west, the Lemosho also allows you to take the Western Breach Route to the summit if you prefer.
OUR LEMOSHO PINTEREST BOARD!
AND WHAT ARE THE DISADVANTAGES?
Not many really. In our experience we reckon it is the wettest route, though that could be just because we have always been unlucky – because meteorology certainly doesn’t back us up on this.
The only other real disadvantage is the cost. The trail is usually completed in eight days, rather than the 6-7 days it usually takes on other routes, so you must pay an extra day’s park fees. Furthermore, the start of the trail is a little more tricky to get to, so transport costs are higher too.
So expect to pay a few hundred dollars more for a trek on this trail. We think that this is money well spent, though we recognise that this may put the trail out of the reach of some. If you would prefer a cheaper option, look at Machame, Marangu or Umbwe.
SO IS IT THE BEST TRAIL ON THE MOUNTAIN?
As we said above, Lemosho is our favourite of the official routes on the mountain. But we think there is a better one: our own Alternative Lemosho Route. This enjoys a couple of significant advantages over the standard Lemosho:
a) Because it takes you away from the southern side of Kibo, so you avoid the crowds swarming around Barranco and Barafu Camp. In other words, the Alternative Lemosho Route is much quieter.
b) In our experience, the Alternative Lemosho Route has a slightly higher success rate too – indeed, it has the highest success rate of any route on Kilimanjaro.
To read more about this route, please follow this link to our Alternative Lemosho Route page on the Kilimanjaro Experts website.
THE LEMOSHO ROUTE ITINERARY
Click on the icon above for the Lemosho Route map
The Lemosho Route (incorrectly called Shira Plateau Route by some agencies) is our favourite of the official trails on Kilimanjaro. It’s a lengthy yet gentle trail, at least by Kilimanjaro’s standards! A path that offers both exceptional chances of seeing wildlife and a higher than average chance of reaching the summit.
As explained in the introduction, there are several alternative routes that you can take on this, the longest trail on the mountain. (The exact length, of course, depends on which of these variations you choose. But to give you an idea, it’s 46.26km ascent only if heading via the Cathedral, or 42.8km if taking the direct route to Shira Huts and then the Western Breach.)
The Mweka descent is 20.6km from summit to civilization. The following itinerary points out where these deviations from the straightest, quickest route can be found.
For this itinerary we take the standard and more popular route via Barranco and Barafu. Most treks on this standard route take 8 days. If taking the Western Breach option, it will probably take a day less.
DAY 1: LEMOSHO GLADES TO MTI MKUBWA/BIG TREE CAMP
Distance: 4.8km; Altitude Gained: 396m

Following a fairly lengthy drive we arrive at Lemosho Glades, where we register, pay the park fees – and where the porters have their luggage weighed to ensure that they are not carrying more than the specified maximum.
(Note that it is no longer necessary to drive to the rather curious fortified village of Londorossi, where registration formalities used to be conducted. Most companies, however, have yet to update their itineraries. So you’ll still see Londorossi written on most schedules.)

The whole of the first day’s trek is spent in some of the most pristine and beautiful to be found anywhere on the mountain. Given the fact this trail sees relatively few tourists, encounters with wildlife are more likely than on most other routes. We will also see some of Kilimanjaro’s more unusual flora, including the beautiful red impatiens Kilimanjarii, one of the great ‘symbols’ of the mountain.
Our first day ends at Mti Mkubwa, the Big Tree Camp (2785m). As with every night on the trek, we will arrive to find our tents already erected and a snack awaiting. A full dinner follows before we settle down to sleep to the sounds of the forest, with monkeys calling and the noisy turaco bird in this most blissful of locations, underneath the spreading branches of a beautiful old podocarpus tree.
DAY 2: MTI MKUBWA/BIG TREE CAMP TO SHIRA 1 CAMPSITE
Distance: 7.19km; Altitude Gained: 719m

This second day, the most varied on the trek, starts off with a continuation of yesterday’s march through the forest. Before long, however, we leave the trees behind to enter the grasses and wild flowers of the Heath and moorland zone. Note how, already, our guide has started to set a deliberately slow pace, in order to help us acclimatize to the lack of air pressure at this altitude.

Still climbing, we eventually round the northern slopes of the Shira Ridge – Kilimanjaro’s little-known third summit – and pause to admire our glimpse of our destination, the magnificent snow-covered Kibo summit.
Descending a short distance, we arrive at our second campsite, the Shira One Campsite (3504m), on the western edge of the Shira Plateau, with views across the plateau to Kibo.
DAY 3: SHIRA 1 CAMPSITE TO SHIRA HUTS CAMPSITE
Distance: 6.9km (10.1km via the Cathedral); Altitude Gained: 391m

For this third day we could just cut a straight path across the plateau towards Kibo, but if you have the energy a wonderful morning can be spent exploring some of the features of the Shira Ridge. These include the Cathedral, from where we get great views across the plateau towards Kibo and along the southern slopes of Kilimanjaro. It is also extremely useful for acclimatizion as we climb steadily to 3720m before descending back to the plateau.

We then continue east towards Kibo, eventually reaching the Shira Huts Campsite (3895m) at the heart of the plateau.
DAY 4: SHIRA HUTS CAMPSITE TO LAVA TOWER AND ON TO BARRANCO CAMPSITE
Distance: 6.7km to Lava Tower (10.1km to Barranco Huts)
Altitude Gained: 732m to Lava Tower Campsite; just 91m to Barranco Huts (732m ascent followed by 641m descent)

The day begins with a slow march directly towards Kibo. The flora becomes more scarce now as we climb ever higher, with only a few everlastings, like living potpouri, decorating the path. It’s a long walk but a very photogenic one with the snowy summit of Kilimanjaro a constant looming presence ahead.

We are now heading into some serious altitude, with Lava Tower, at the foot of Kibo, our next destination, standing at 4530m above sea level. It is here that the path splits. If we are planning on continuing onto Barranco this evening on the ‘usual’ Lemosho Route, we will take lunch near the Lava Tower.
But if we’re plan to climb via the Western Breach, we will camp at Lava Tower (follow this link for a Western Breach itinerary.
It is normal for people to have a slight headache at Lava Tower, or after descending to Barranco Camp (3985m). This is entirely normal, and only worrying if the symptoms persist.
By way of compensation, Barranco is perhaps the prettiest campsite on the route, though it’s often overcrowded. Snacks and then dinner is served in the evening.
DAY 5: BARRANCO CAMP TO BARAFU CAMP/HUTS VIA KARANGA VALLEY
Distance: 8.5km; Altitude Gained: 676m
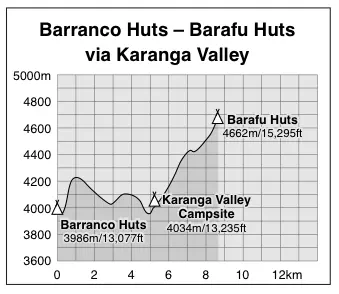
This long day begins with the steepest section of the entire trek as we spend the first hour or so climbing the Breakfast Wall. From here the path meanders across scree slopes as we traverse the southern slopes of Kibo. A steep drop then brings us to the floor of the flora-rich Karanga Valley. This lies 4034m above sea level, and 5.1km from Barranco Campsite. Though our destination for lunch shares its name with this beautiful valley, it actually lies a stiff 20- minute climb up the opposite side of the valley.
Depending which itinerary we’re following, we may stop overnight at Karanga. Otherwise, we will have lunch while enjoying the views north towards the southern face of Kibo. This, hopefully, will distract us from any ill effects we may be feeling because of the altitude.
A short afternoon follows (3.4km) as we traverse the southern side of Kibo, walking through a spectacular lunar landscape quite bereft of life. It’s mostly straightforward, though the initial walk from the camp is almost entirely uphill and quite relentless.

Climbing onto a ridge, we reach chilly Barafu Camp (4662m) on the south-eastern shoulder of Kibo. Here we will rest, take both lunch and dinner, and try to get some sleep before the rigours of the night ahead….
NIGHT 5/DAY 6: BARAFU CAMP/HUTS TO SUMMIT AND DESCENT TO MWEKA CAMP/HUTS
Distance: 4.86km to Uhuru Peak; then 11.5km descent to Mweka Camp;
Altitude Gained: 1233m to Uhuru Peak, then a descent of 2789m.
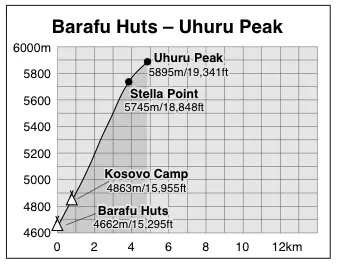
Arising at around midnight, we begin our slow march up to Stella Point (5745m) on the edge of the Kibo crater. It’s a steep, slow, cold march and a test of our endurance – this is where we earn your Kilimanjaro certificate.
Nevertheless, providing you have avoided altitude sickness, there is no reason why you shouldn’t make it up to Stella Point. This we reach, all being well, at around 5am, though it can be much later depending on your condition.
From Stella Point it is a mere 45 minutes further on, past glaciers and snowfields and with views over the Kibo Crater, to Uhuru Peak – at 5895m the highest point in Africa!
Here, if we’re on time, we can watch the sun rise over the African continent, take photos – and take a breather too!

The descent
After a rest at the top, we continue back down to Barafu Camp – a walk that is considerably quicker than it was on the way up! At Barafu we take breakfast and relax for an hour, before continuing our march down the mountain, this time on the Mweka Trail.
Today’s walk takes us back down through the alpine desert, heath and moorland zones until we once more enter the forest zone via Millennium Camp (3827m). There, amongst the trees, we find the Mweka Campsite (3106m), our final stop on the trek.
We should arrive there at about 4pm – and we have been walking for around 16 hours, less breaks! Exhausting but, if we made it to the top, we’ll think it was worth it!

DAY 7: MWEKA CAMP/HUTS TO MWEKA GATE
Distance: 9.1km; Altitude Gained: 1473m

It’s just a couple of hours further now from the campsite to Mweka Gate (1633m). Those who made it to the summit or Stella Point will collect their certificates. A car will be waiting to take us back to your hotel, and a land of warm showers and cold beers. Our trek is at an end.
Lemosho Route GPS
For a file of GPS waypoints for all our routes, please click on the following link GPS Waypoints. This will take you to the relevant page on the website of Trailblazer Publications, who publish the Kilimanjaro guide. The file is in .gpx format, so you can download it straight onto your GPS.